Posts

corking a Bremner sssssshhhhhhmute

Image
 This is probably a little off-topic for this blog but I like traditional acoustic instruments as much as electronic ones.  I'm primarily a brass player, own a cornet (Sovereign round-stamp, 1976 from the serial number. Never bettered) and a flugel. (Yamaha, with valves that seize up when left for more than a day without moving them).  Obviously I have a large collection of mutes for each, including this practice mute for the cornet. It's great, really quiet.  However, the 'seal' is made of what used to be some kind of foam and over two decades has turned to dust. Some of these mutes (I guess later ones than mine) have cork, which seems like a better idea. In fact you can buy official replacement cork but after adding postage I found that a bit pricey. You can also buy self-adhesive thin cork , which I have done for this and another job. Here's how I made a template and cut that to the right size and shape. First I wrapped a piece of paper tightly around the mute. T...

Building a Haxophone : Part 1, the whys and wherefores, buying and ordering parts

Image
For a long time I've wanted a good wind-instrument-based MIDI controller. A few years ago I bought an Artinoise re.corder. I like it but it's not ideal for me. Before we get to the Haxophone, I'll expand a little on my issues with the re.corder.  It doesn't have wired USB MIDI, only bluetooth. This does allow it to connect to the dedicated app and my Mac. But bluetooth is always a bit of a faff and there is bad latency in this case, which may be the fault of the bluetooth, or the instrument itself or both. If it worked over USB, it could reduce the latency to zero. I'm almost always using it in the studio and wouldn't mind the cable. Maybe this next point is a configuration issue. I remember discussing the issue on forums so I'm sure it isn't just me. You need to blow quite hard to get a response. I helped this issue by partially blocking the air-escape hole (the fipple if using it as an acoustic recorder) but I still don't particularly enjoy playing...

Building a Brachiograph

Image
 At Liverpool earlier this year, Andy Piper was demonstrating his brachiograph, or lolly-stick drawing robot arm. Ever since I first had my ZX81 I've been mildly curious about robotics but have never taken the plunge. More recently I've been looking at various plotter projects, even bookmarked a few. Seeing this one in real life and seeing how cheap and easy it was to build (and my boyfriend chucking some servos in my direction) finally tipped me over the edge.  This project turned out to be, as billed, the perfect gateway into robotics. It really is very simple to build and there are tutorials online, including from Andy himself . Thanks for all this Andy! Lots of hotglueing ensued. So far this has all been very robust.  To make the wiring neater, I made this little distribution board. First I screwed the Pi Zero down and found that I couldn't plug anything into it, so had to cut a little plinth for it. I'm not going to pretend that installing the software went without...

Fitting the MT32 Pi Zero HAT and configuring the software

Image
This post will provide the information you need for setting up my Pi Zero HAT for MT32-Pi. Note that to run MT32-Pi, a Pi Zero 2W is required . The HAT will work with a regular Pi (3 or above) but obviously the form factor is designed to go with the Zero.  Four long screws and nuts are provided, with standoffs and washers. The standoff isn't quite long enough and so the washer goes alongside it between the boards to give the extra mm of hight.  Don't push the HAT all the way home, that'll help with the fiddly job of fitting the washer and standoff.  With the nuts fitted finger-tight, you may like to trim off the extra length. If I didn't supply an SD card containing the software, then you can find that here: https://github.com/dwhinham/mt32-pi See Dale's instructions for creating your SD card here: https://github.com/dwhinham/mt32-pi?tab=readme-ov-file#-quick-start-guide You'll need to do some configuration of the file mt32-pi.cfg This is very easy, just open it...

Tripod mount and cleartop option for e-ther

Image
 I've been wanting to design a tripod mount for e-ther for a long time. I find that the rubber feet grip the glass surface of the desk it's usually used on but it can still move around if the cables are heavy or not routed well. Users have asked for this too. After trying a 3D-printed design and lasercut acrylic, the latter worked best for me. The clear acrylic reminds me of those stands for model aircraft. "Ignore me", it says. It's easy to fit, it comes with the four screws you'll need. It has a brass insert for the standard tripod thread (1/4" x 20) and has an extra ring for reinforcement.  It's an optional extra when you buy an e-ther, I've priced it initially at an additional $4 US. At the same time, I had some crystal clear faceplates cut. I'll be honest, clear cases for electronics is not my bag but a lot of people like it and some have asked for this option with e-ther. So here it is. Here's e-ther with the tripod mount and a clear...

Prototype Wednesday :: 25 Oct 23 :: a 16-step analogue sequencer using 2 Baby8s?

Image
 Since I was given some Rakit kits one year for my birthday, I've been wanting to join two baby8 s to make a 16-step sequencer. I've returned to this project a number of times but never really got out of the starting gate. (Yes there are one or two published projects but part of the enjoyment of this for me is to work out how to do it myself from scratch.) Initially I attempted to use logic to direct 8 clock signals into one and then 8 into the other. But then hit on the idea of running them in parallel - offsetting them by inverting the original clock signal.  (This has the added advantage that it would be possible to 'swing' the rhythm by adjusting the duty cycle of the original clock signal). This is the furthest I've got with it so far. It makes an eye-catching and ear-splitting demo but there are still too many problems to solve. Some that I had predicted and some that I discovered along the way.  None of the challenges are unsurmountable but it requires more ...

e-ther 2 - Announcement and full rundown of features

Image
I'd like to announce the new and improved e-ther 2. This information is available in video form here . If you're not familiar with e-ther, then it's a small theremin-like instrument with MIDI and audio out . At first glance the differences aren't obvious and indeed the big changes to the hardware are internal.  However, I hope you'll find the list of new features as exciting as I do.  Hardware-wise, I've put the microcontroller and DAC onto the main board.  Although this increases costs (for me, not for you), there are some big advantages. Besides looking more professional, the audio module is no longer a 'buy separately' optional extra. It's incorporated and the audio jack is just there if you want it.  The audio module used to fit below the board but with the audio capability now built-in, the profile is more compact. Most of the new features are down to firmware which means that a large proportion of what I'm calling 'e-ther 2' will be...

Sunday morning jams

Image
I really enjoy making music but the whole process is a bit agonising. Creativity doesn't come easily and this has led to a cycle of starting something and then worrying about it for a week, maybe adding to it but more usually not adding to it and letting it fall by the wayside with some guilt. Last Sunday I woke up with a chord sequence in my head, sat down in front of Logic and by lunchtime had piece that I was really happy with. (It took just as long to shoot some footage and make the video, but that's another story). I decided to try the same thing this week. I tried not to think about it too much beforehand and sat down on Sunday morning with a new empty project and no ideas. Once again something had taken shape by lunchtime.  I would like to work on some of those parts, do more with the arrangement and play the brass parts myself (electronic brass is never good!) and maybe I'll return to this project in the future and do all of that. But the point is that setting aside...

Granulator synth explainer, using e-ther for expressive control

Image
I first made e-ther because I wanted to play it as a theremin-like instrument. The ways that people are finding to use it is blowing me away.  Here's Josh explaining Granulator and using e-ther to control its parameters. It's hi-tec and very effective.  The movable piece of wood to hold the horizontal control is low-tec but equally effective! e-ther:  https://peacockmedia.software/e-ther/

e-ther - unboxing video and music-making

Image
I haven't gone out of my way to send free stuff to influential Youtubers. I don't always enjoy those videos. When someone has bought the product, the review is way more genuine. I've enjoyed Kale's videos for a long time, He enjoys building, collecting and experimenting with musical instruments from didgeridoos to modular synth components.  I was delighted when he ordered an e-ther with no prompting from me. Here are his unboxing and his first experiments with the device.

Enclosures for MIDISID

Image
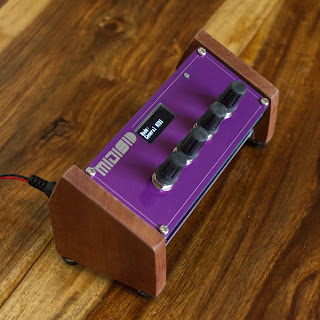
 The default configuration for MIDISID  looks fine and is functional. I have fitted wooden cheeks to my own, which gives it a look and tilts the top forward, making it a little easier to use when you're sitting back from it. MIDISID was designed from the start with 'bring your own box' in mind. It's a modular design, the top and bottom parts are easily separated and connect with a 4-way jst-sh cable. In my head I saw it being used in a sloping-top case. Paul of Bad Dog Designs has come up with a different solution. It achieves the same goal - tipping the controls and screen forward. It's a 3D print in two parts. It takes zero effort to fit - MIDISID just drops in. I don't know whether he has made the design files public but  please contact him  if you're interested. Update Nov '23 The current version of MIDISID is now larger, has a tilted front and custom side supports: Owners are still being creative with enclosures. Here's a beautiful one from  @k...

Music for an Imaginary Martial Arts Game, entirely using MIDISID

Image
This is an original tune that goes back a long way and if you rummage through my older videos you'll find versions (sometimes called Eastern Promise) played using real C64 (3 voices).   This time I wanted to use MIDISID and make a multitracked version using SID voices. It still doesn't use a large number of voices. There are six tracks in Logic, including two percussion tracks which somehow aren't shown in the video, and I'm mostly using polyphonic mode but I think the chords just have two or three notes.   The only effect I've applied is a little reverb on the recorder. The rest is as captured from the back of MIDISID.The advantage of multitracking is that you can set the relative levels of the voices, which is hard to do with SID when you're using different sounds using different waveforms.   More info about MIDISID:  https://peacockmedia.software/midisid/

MIDISID - second batch and giveaway

Image
The first MIDISID batch ('earlybird' pricing) have now all gone, I have the materials for the second batch and the first of those are now made.  There are now black and purple editions. At risk of going all Tim Cook, the black really does look gorgeous. Hardware-wise they're hardly altered but the firmware ('MIDISID OS') has come a long way, new features include: you can set glide speed modwheel support; choose vibrato, filter cutoff or pulse width Increases the range of vibrato, to enable spooky effects Now supports RPN 0 messages - for setting the pitch bend range. (This was important for getting my tiny MIDI theremin working - see https://twitter.com/midi_in_out/status/1574870874158764035 ) ( The manual is here in case you'd like to read about all of the features.) I'll shortly be mailing those who have bought MIDISID already with details for the new firmware. Giveaway Because I'm an idiot, I (genuinely) accidentally bought a second copy of @C64Audio...

MIDISID Sunday: Bring your own box

Image
No music video this week, I have a piece of music which I am really happy with, but I'd rather give it another week and make it better than rush something out half-baked. So here's what happened with my first attempt at an 'enclosure' for MIDISID .  I like the idea of a slanted-front box with wooden sides, but I had the idea of angling the top by just adding wooden sides.  Here's the first go. It's simply a rectangle of scrap wood, around 65mm x 100mm, cut at an angle through the centre to make two identical pieces. Sanded and waxed.  I made the angle brackets (10mm x 10mm x 50mm) from a chip tube. (Later found to be a little bit flexible, would be better cut from metal). They're drilled with smaller holes for tiny self-tapping screws, and bigger (3mm) holes for the mounting holes in MIDISD's PCBs. Note that MIDISID comes apart for installing in a box or enclosure. The top part is connected to the bottom with a standard JST-SH 4-way cable, you can buy a ...